Jamstack came out just six years ago but has gained traction rapidly among the community. In fact, Netlify’s 2020 State of the Jamstack Survey states more than two-thirds of respondents have been using it for the last two years.
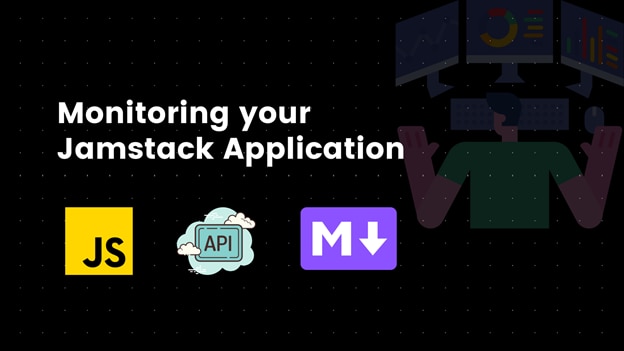
However, with its undeniable popularity, Jamstack also brings complexity, with an application dependent on several tied parts. This makes actively monitoring Jamstack applications crucial. In this tutorial, I’ll walk you through what Jamstack is, how to build a Jamstack app, and the essentials of monitoring your Jamstack application.
First, What’s Jamstack?
Jamstack is an approach to building faster and more scalable web applications. It doesn’t introduce a new framework or technology but uses existing languages and technologies to create a different architecture for web applications.
Unveiling the JAM in Jamstack
The JAM in the Jamstack stands for three technologies: J for JavaScript, A for APIs, and M for Markups. In other words, a Jamstack app features JavaScript on the front end, APIs to tie the front end to a back-end server, and markup to handle the application’s content.
Each of these three components may use any framework, tooling, or library.
Decoding the Jamstack
This diagram sheds light on how the elements of Jamstack can be combined into a general framework.
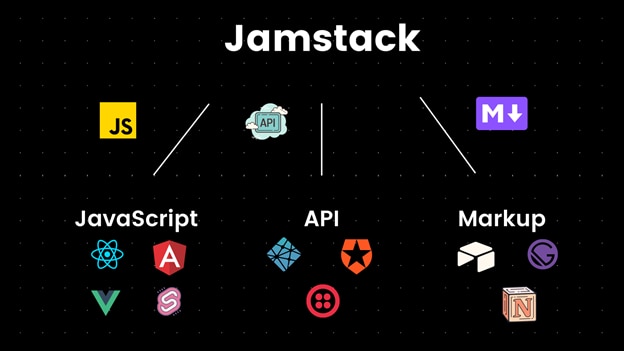
The JavaScript in Jamstack
The first element is the front-end framework or library. This could be React, Svelte, Vue, or Next—anything that suits you! Also, you’re free to use any other tooling you generally use. For instance, maybe you want to set up a custom webpack tooling for your React app and go isomorphic. Or maybe you want to use a design library like Tailwind CSS.
The key with the front end in Jamstack is decoupling. Jamstack advocates that no matter what you use on your front end, it should be completely decoupled from your back end. Your front end should only be concerned with how your application looks and feels to end users. The server-side logic is completely decoupled from it.
The API in Jamstack
The second element of this model relies on the concept of making an HTTP request to a server or a web service for any data in the application. You’re not limited to a single back-end server for your APIs. You can use third-party service providers, SASS, webhooks, etc.
You’ll need to build a back end that manages the data specific to your application. For common functions, such as a messaging service, emailing, payments, and authentication, your Jamstack app can rely on existing third-party APIs.
If you look back at the Jamstack diagram, you’ll see auth0 and netlify as tools/frameworks under the API components. For a Jamstack app, you can use auth0 or Netlify Auth as an authentication provider. These are APIs that you don’t necessarily own and maintain.
You could also use something like AWS Amplify or Netlify serverless for your APIs.
Traditional server-side rendered apps aren’t Jamstack since they don’t have a decoupled architecture. These web apps are built with a single server-side technology like PHP, Go, or Rust and use both the JavaScript and API components of the technology instead of decoupling them.
The Markup in Jamstack
The last element, markup, refers to the actual content of your site. Before we unravel it, let’s tie up the first two elements and use an example to make some sense of it.
Take an application built with a React-based front end that makes an HTTP request to a set of custom APIs or back-end. In a Jamstack app, the APIs don’t return basic JSON data; instead, they provide statically generated HTML the React app can render. A great example of this type of scenario is rendering blog posts from a CMS. The API could also create markup specific to the React app. The application takes the markup content, adds relevant HTML tags, and renders it on the webpage.
The goal of the Jamstack framework is for your application to be able render content extremely quickly. Static site generators like Hugo or Gatsby are a great choice for this.
Putting It All Together
The Jamstack’s philosophy directs developers toward an abstracted and decoupled client-server architecture, prolific use of both custom and third-party APIs, and fast delivery of the application’s content via serverless, a static site generator, or a CMS.
Advantages of Jamstack
First, applications using Jamstack are fast. The architecture shifts toward generating static HTML pages at build time and simply serving them, which is much faster than generating pages on the fly. You could easily serve these pre-rendered pages via a CDN rather than a traditional web server.
This brings us to another great advantage: Jamstack is cost-effective. You’re now hosting static pages, which is cheaper than traditional server-side code. Maintaining static assets is simpler than maintaining dedicated servers and makes it easier to scale your app for millions of users.
Building a Jamstack App
Let’s build a simple Jamstack app using React, Airtable, and Netlify serverless functions. We’ll keep the focus more on the philosophy of our Jamstack app than its functionality.
Airtable Setup
We’ll use Airtable as our database and our M (Markup) component. If you don’t have an account already, head over to Airtable and sign up to create a new account.
Once you sign up, you’ll need to create a new base.
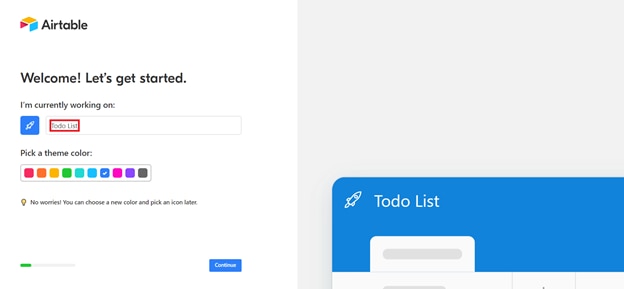
A base in Airtable is like a database. We can create tables inside a base and store some data inside those tables. Let’s name our base Todo List.
Next, we need to set up a schema. This way we’ll tell Airtable what kind of data we plan to store inside this base. We’re tracking tasks using our Todo List base, so we’ll create a table named Tasks.
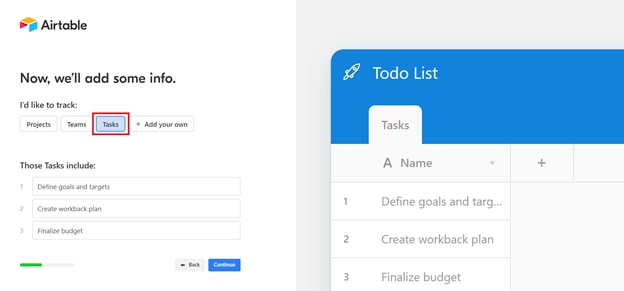
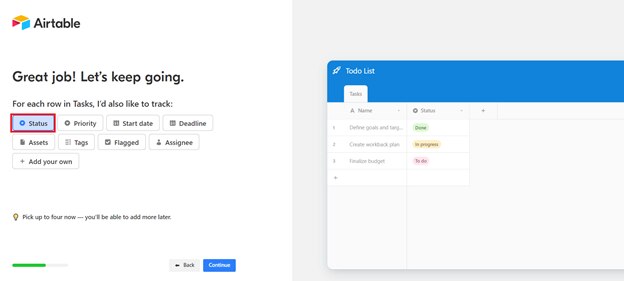
After that, we’ll specify what each entry in the task table will contain. We already have the name of each task. Now, let’s add another property called Status.
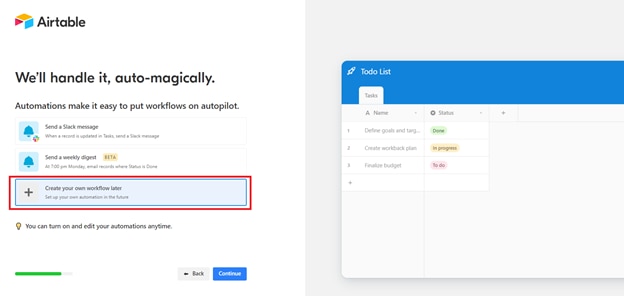
Great! After that, you might be asked to set up a workflow. We don’t need this now, so choose “Create your own workflow later.”
Our Airtable is all set now to store and retrieve data. Let’s move ahead.
Environment Setup
We’ll use React for our JavaScript component. You’ll need to first install NodeJS and npm.
Then, create a new React app by running:
npx create-react-app jam-stack-appNext, let’s install a few packages or dependencies we’ll need. Since we’ll be using the Airtable API to interact with our Airtable database, we’ll need the Airtable JavaScript package. Also, we’ll need a safe space like a .env file to store our API keys.
We need to install the dotenv package to use environment variables locally and when deployed:
npm i dotenv airtableConfiguring Airtable
To use Airtable APIs in your app, we need the Airtable base we’ll be working with. Next, we need the name of the table inside our base where we’ll be pushing and pulling data. And of course, we need an API key that allows us to interact with our Airtable APIs.
The table name we’re using is Tasks. To get the base ID, head over to the Airtable API page and select your base.
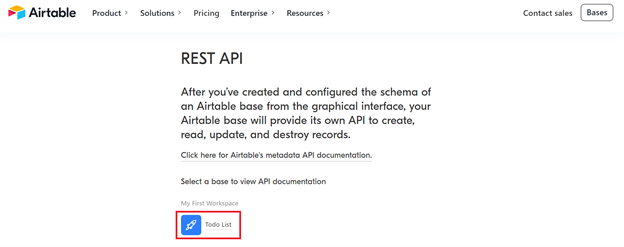
Click on the Todo List base to bring up the API page. There, you’ll find a base ID or the unique identifier of our Todo List base. Grab that and store it somewhere.
Now we need to generate an API key that will allow us to start using Airtable APIs. Here’s a quick guide on how to do so. In short, you need to head over to your Airtable account and click on the Generate API key button.
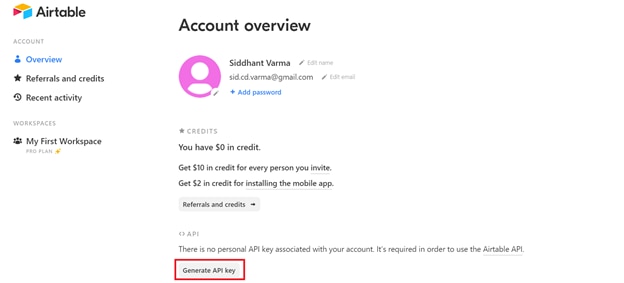
Airtable will now generate a unique API secret key for you, so grab it and store it somewhere safe.
Creating a .env File
Now that we have all our credentials, let’s store them inside a .env file. Open the React project we created earlier and create a .env file inside the root directory.
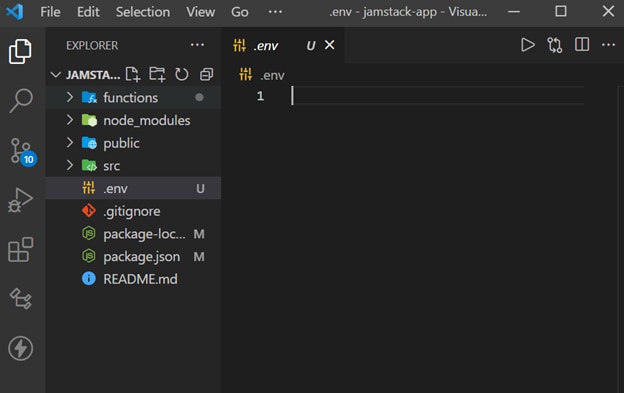
Inside the file, add the following key and values. Here, you’ll need to pass in your own API key and base ID we talked about in the previous section.
AIRTABLE_API_KEY=***
AIRTABLE_BASE_ID=***
AIRTABLE_TABLE_NAME=Tasks
Now we need to configure Netlify for our serverless functions.
Configuring Netlify
Jamstack is all about decoupling. Our front end lives inside our src directory, but our back end will be a bunch of serverless APIs in the same project that our front-end can consume.
Before we create that directory, we need to tell Netlify where to look for these functions when our app is running. And even before that, we need Netlify.
Installing Netlify CLI globally allows us to run Netlify serverless functions locally.
npm i -g netlify-cliNext, we’ll need a config file that tells Netlify where our serverless functions will live. Inside the root directory, create a file called Netlify.toml that contains the following code:
[build]
    functions = "functions"
[[redirects]]
    from = "/api/*"
    to= "/.netlify/functions/:splat"
    status = 200
In the above example, we tell Netlify our build functions will reside inside a directory called functions. We’ve also set a redirect here that we’ll talk about later.
Finally, let’s create a functions directory inside the root of our project. Here is where all our serverless magic for our JAM stack app will reside.
Creating Netlify Serverless API
It’s time to build some fast serverless APIs with Netlify. Let’s build a simple Netlify Serverless GET API that returns us all the tasks inside the Airtable Tasks table of our Todo List base.
Creating Airtable Helper Function
Go to the functions directory and create a folder helper. This helper folder will contain all the helper files we’ll use.
Inside this file, create a new file called airtable.js. Add the following code:
require('dotenv').config();
var Airtable = require('airtable');
var base = new Airtable({ apiKey: process.env.AIRTABLE_API_KEY }).base(
    process.env.AIRTABLE_BASE_ID
);
const table = base(process.env.AIRTABLE_TABLE_NAME);

module.exports = { table };
In this example code, we first import the dotenv package and call the config() method on it. This allows Netlify to tap into our environment variables at runtime. Then, we get a reference to the Airtable package we installed and create a new instance of it by passing our API key inside it.
We then create a reference of our Airtable base by calling the base method on our Airtable reference and passing the base ID inside it.
Finally, we create a reference to our Tasks table inside our base and export it.
Creating the dataFormatter Middleware
To consistently format the data returned by our serverless APIs, create a file dataFormatter.js inside the same helper directory. Add the following code to it:
module.exports = (statusCode, body) => {
    return {
        statusCode,
        body: JSON.stringify(body),
    };
};
This code simply outputs a status code and stringifies the JSON object while returning it.
The getTasks API
Next, let’s create a file getTasks.js inside the same helper directory. Here we’ll get the table reference we created earlier, grab all the tasks inside it, and return it via the dataFormatter middleware we created earlier.
const { table } = require('./airtable');
const dataFormatter = require('./dataFormatter');

module.exports = async (event) => {
    try {
        const tasks = await table.select().firstPage();
        const formattedTasks = tasks.map((course) => ({
            id: course.id,
            ...course.fields,
        }));
        return dataFormatter(200, formattedTasks);
    } catch (err) {
        console.error(err);
        return dataFormatter(500, {});
    }
};
To use that function as an API, we’ll create a file called tasks.js outside the helper directory with the following code:
const dataFormatter = require('./helpers/dataFormatter');
const getTasks = require('./helpers/getTasks');

exports.handler = async (event) => {
    if (event.httpMethod === 'GET') {
        return await getTasks(event);
    }
    else {
        return dataFormatter(405, {});
    }
};
The above code wraps our getTasks function as a GET request.
Testing the Serverless APIs
You can bring your serverless APIs to life by running Netlify dev inside the project.
netlify devThis will run your React project alongside your Netlify serverless APIs on localhost:8888.
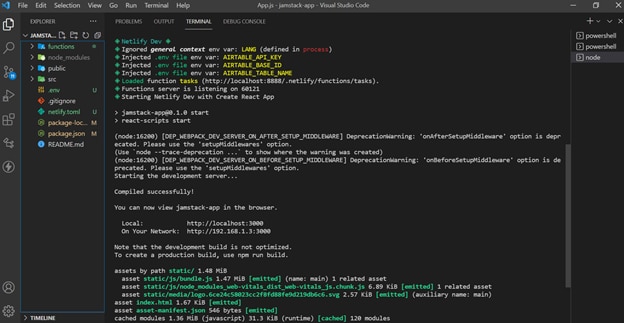
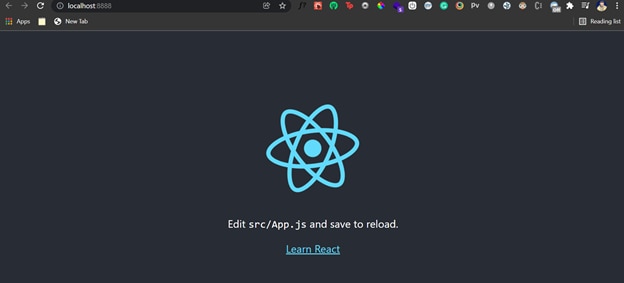
If you now visit http://localhost:8888, you should see your React front-end server.
And now if you visit http://localhost:8888/api/tasks, you should get back a bunch of tasks that were present inside our Airtable tasks table.
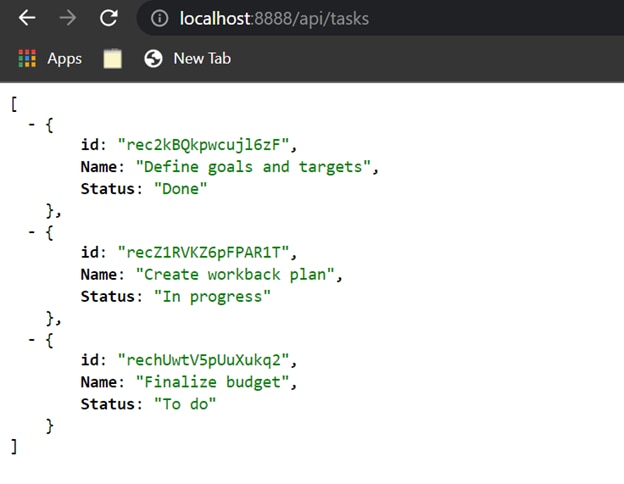
Remember the redirect we set inside our Netlify.toml file? It helps us run these serverless APIs on a shorter and more precise base URL.
Almost there! All we need to do now is consume these serverless APIs in our React app.
Consuming Serverless APIs in React App
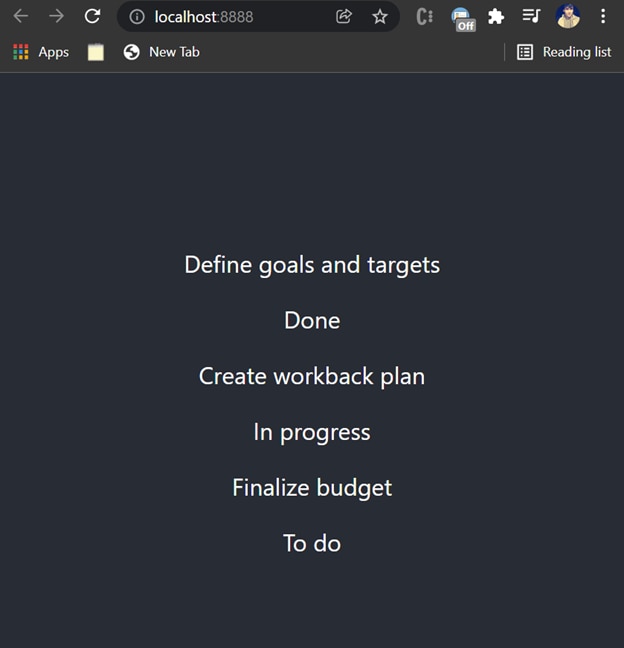
Open the App.js file inside your src directory. Create a simple piece of state to store the tasks. Then, use the fetch method inside a useEffect to fetch these tasks from the API when our <App/> component loads or mounts on the DOM. Then, store this data inside the piece of state created earlier. Finally, loop through this state and render each item on the DOM inside our App component’s JSX.
Here’s how your App.js file should look:
import './App.css';
import { useState, useEffect } from 'react';
function App() {

  const [tasks,setTasks]=useState([]);

  const fetchTasks=async()=>{
    const response=await fetch('/api/tasks');
    const data=await response.json();
    setTasks(data);
  }

  useEffect(()=>{
    fetchTasks();
  },[])

  return (
    <div className="App">
      <header className="App-header">
          {
            tasks.map(task=>
              <div key={task.id}>
                  <p>{task.Name}</p>
                  <span>{task.Status}</span>
              </div>
            )
          }
      </header>
    </div>
  );
}

export default App;
If you now visit your React app, you should see those tasks on the page.
Jamstack Deployment With Netlify
Let’s deploy this application and talk a bit about monitoring the deployment. . We’ll use Netlify for the deployment, so make sure you have an account on Netlify. Since Jamstack apps are fast, the applications generally have a better first contentful paint than traditional web applications.
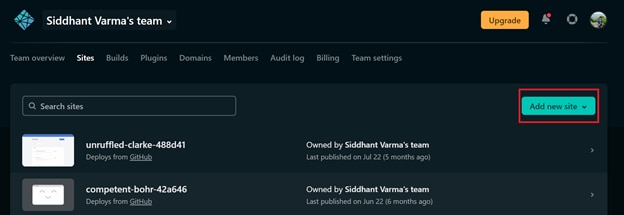
After you’ve pushed all the above code to a public git repository like this one, head over to Netlify and create a new site.
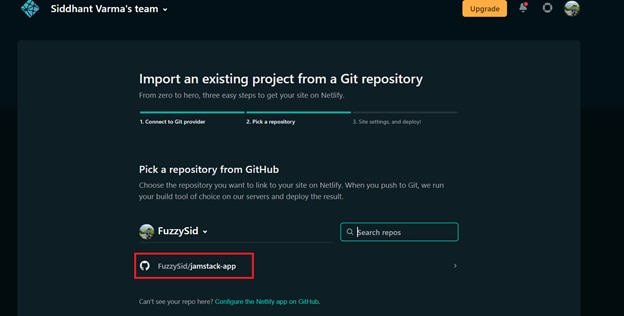
Then select the repository where you pushed all your code.
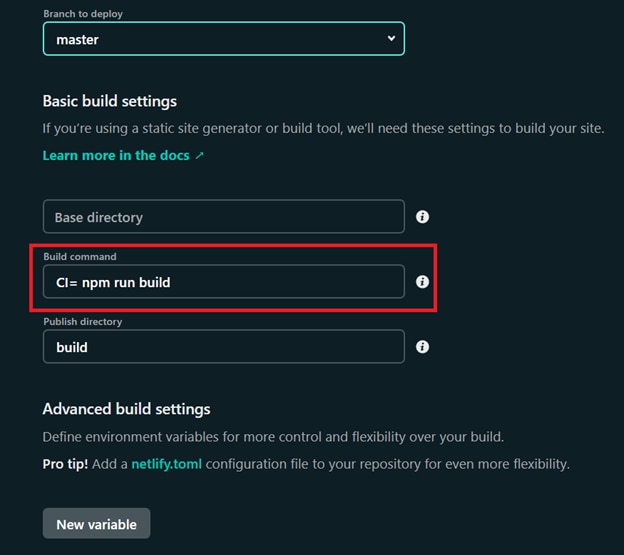
You’ll need to change the build command from npm run build to CI= npm run build to avoid warnings being interpreted as errors by Netlify.
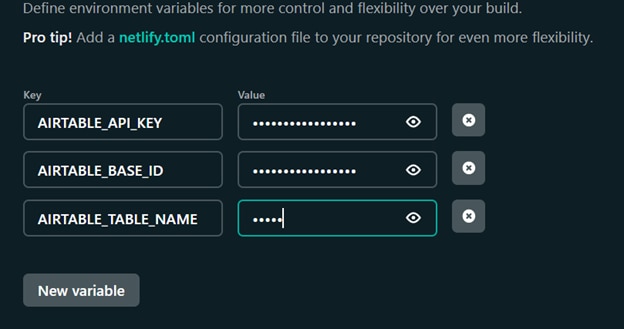
We now need to add our environment variables under the Advanced Settings. You’ll need to add all your environment variables here as you did for your .env file.
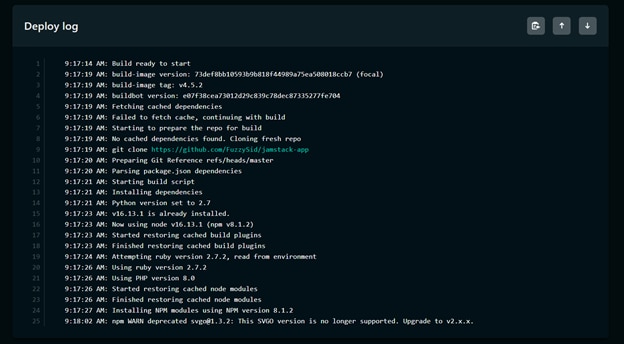
Now hit deploy and go to your production logs. This is where you can monitor your Jamstack app’s deployment on Netlify.
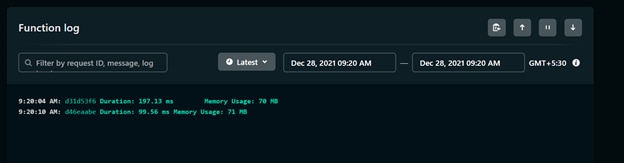
If everything goes smoothly, and it should, your Jamstack app should now be live! You can also monitor your serverless functions after deployment by viewing the functions log.
Monitoring Live Jamstack App
Where monitoring deployment is essential, it’s also important to monitor how your app responds to the live users. Let’s set up LogRocket to monitor our Jamstack app live.
First, you’ll need to set up an account on LogRocket for front-end monitoring. Then, you’ll need to head over to the setup panel and put the script tag inside your React project’s index.html file.
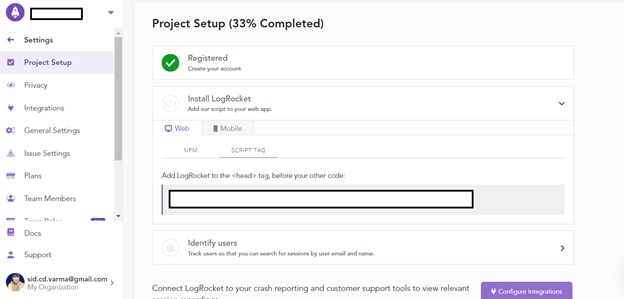
That’s how your JAM Stack app is connected to LogRocket for live monitoring. Now all you need to do is push your changes to Git, and Netlify will auto deploy it for you.
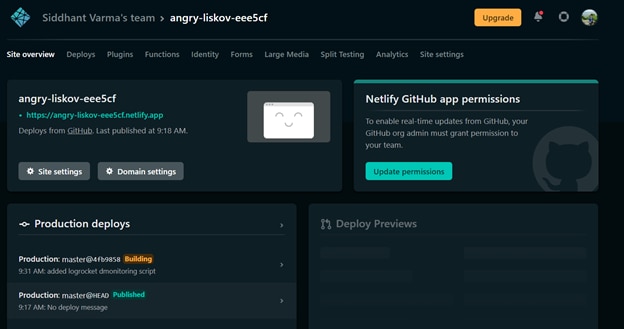
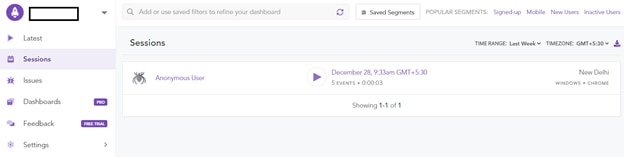
When the deployment finishes, you can head inside your LogRocket session tab to monitor sessions for live users on your app.
Monitoring System Logs With Papertrail
Often, your applications crash because of issues in your hosts or other back-end systems. We’ve seen how our Jamstack app has a lot of moving parts. It’s got an Airtable database, serverless APIs, and a decoupled front end.
It’s equally imperative to monitor our system logs, and we can do so easily with SolarWinds® Papertrail™.
Make sure you create an account on Papertrail, then head over to your dashboard to create a new system.
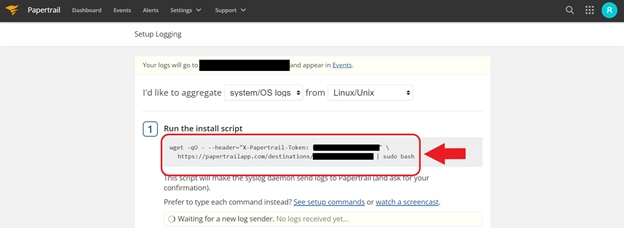
Copy the above installation script and run it on your system. It should do everything for you.

And if you go back to Papertrail, it should already have begun receiving your system logs.:
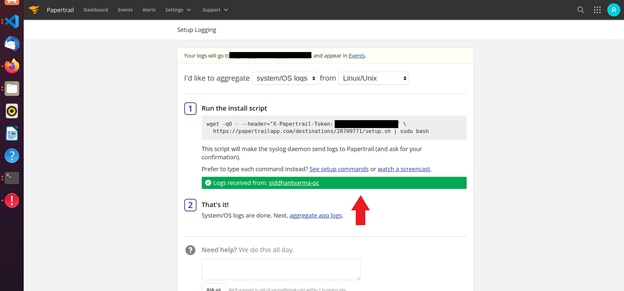
If you visit the Events tab, you should see those logs live.

Awesome! You can add logs from other systems or applications to your Papertrail account and consolidate your log data into a single easy to search repository. Papertrail connects the log data you send it and creates clickable links in the event view that let you explore other events related to the hostname, IP address, user ID, etc. In this way, the more event data you send Papertrail, the more value you can get out of it. Papertrail also lets you search and pause live event streams and send alert notifications when specific event conditions arise.
Conclusion
This article covered creating and monitoring a Jamstack app. Remember, your Jamstack app could be the next tech product waiting to get millions of users on board. With that kind of scale, you’ll need to incorporate scalable monitoring and alerting to keep your users coming back.
As next steps for learning more on Jamstack, why not go ahead and write a bunch more serverless APIs to complete the CRUD operations on our Todo List app? That should be a fun learning exercise and might help you build more complex Jamstack apps in the future.
This post was written by Siddhant Varma. Siddhant is a full stack JavaScript developer with expertise in front-end engineering. He’s worked with scaling multiple startups in India and has experience building products in the Ed-Tech and healthcare industries. Siddhant has a passion for teaching and a knack for writing. He’s also taught programming to many graduates, helping them become better future developers.